fall fun friday: interchangeable burlap wreath.

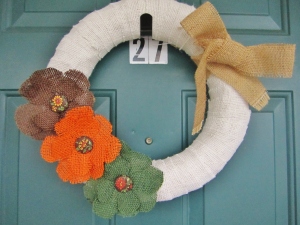
Who doesn’t love burlap? And who doesn’t love wreaths? You see them just about everywhere on Pinterest. I, for one, am a huge fan. This is why I decided to make a burlap wreath. Makes sense. It was my first wreath project and I’m quite pleased with how it turned out. I also made it interchangeable so that each season, I can change out the flowers instead of making a new one every time.

there’s my wonderful bow tying skills again

What you need for this project:

  • 1 wreath form (Walmart for $1.50)
  • 1 yard of neutral colored burlap material (Joann’s for $1.25)
  • 4 various colors of 1/2 yard of burlap (Joann’s for $0.75 each)
  • 1 Button Cover Kit (Walmart for $1.75)
  • Colorful fabric to cover buttons with (Walmart for $0.33) [you don’t need much!]
  • Wreath hook (Walmart for $2)
  • 3 clips (for back of flowers to clip-on) -already had these
  • Hot glue gun
  • Scissors

You read that right homies, this project only cost me a whopping $10 to make. You can’t find a cuter, pre-made wreath for that (well maybe you can, but I’m a little biased)!

I will try to post a tutorial on the wreath later if enough crafters or wanna-be-crafters (such as myself) would like to know more details on how I made this. Honestly, it was pretty simple.

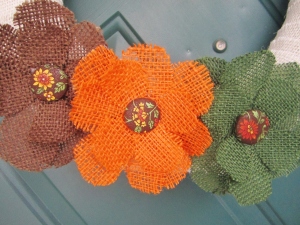
a closer look at the flowers.

I made the buttons using a “cover button kit” you can buy at walmart and bought some fabric that had all three colors in it to cover them. It was really easy and they turned out perfect.

To make the flowers interchangeable, you will need to cut three pieces of the base color burlap and wrap them loosely around the wreath so as to leave room for a clip to be placed on, then hot glue alligator clips (or something similar) to the back of each flower and clip them to the three loose piece of burlap.

Now all you need to do is collect different colors of burlap throughout the year to change them out for each season and/or holiday. You could even do different shapes to change it up. The possibilities are endless, children.

That’s it for my autumn decor. As we say in Kentucky…..happy fall, y’all!

fall fun friday: candle votives.

Today’s fall decoration project is very, very easy and affordable. I will say one thing quickly, when decorating for various seasons or holidays, try using things that you already have and maybe just change it around a bit to fit the particular time of year. It could be changing out ribbon color on something, or different flowers for the appropriate time of year, or just switching out candles of different colors. I do that a lot and it not only saves time, but money as well. And come on, who doesn’t want to save money these days?

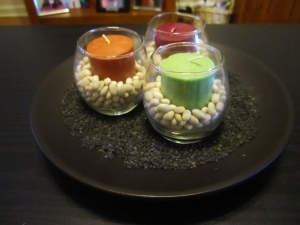
So. On to the point of this post…the decoration. Here it is:

All I needed for this project was:

  • 1 bag of dried “navy beans” (left over from last week’s project)
  • 3 glass candle votives ($1 each at Dollar General)
  • 3 small candles of various fall colors (44 cents each at Walmart)
  • Round base (already had)
  • 1 bag of black rocks (already had)

The process of the project is pretty self-explanitory from the pictures, so I won’t give the details on how I made it. I just wanted to share because it was such an easy and cheap project. This decoration can sit just about anywhere in your house. It could be a kitchen table centerpiece or an end table decoration. For us, it’s in the middle of our coffee table in our living room. I like seeing it as soon as I walk in the door.

I’ll go ahead and give you a hint for next week’s project: it hangs on the door. Hmmmmm…

9/11, never forgotten.

It was a normal Tuesday morning…just like any other morning (or at least I thought so). I was sitting in my 3rd period class working on some pointless assignment, when I noticed some students had gathered around my teacher’s computer. I got up and walked over to see what all the buzz was about. When I caught a glimpse of the screen, there was a video of a plane crashing into a realllllly tall building.

My  teacher said, “Those are the World Trade Centers. Two planes have crashed into them this morning. At first they thought it was an accident from a private plane, but after the second one crashed they are now saying it was a possible terrorist attack”.

“The what centers??” I think to myself. “A what attack???”

Afterall, what thirteen year-old knew what the WTCs were? I sure didn’t.

Later that day, we found out our volleyball game and all extra curricular activities were cancelled for that afternoon. I went home and shortly after, my sister arrived home. My mom told us to take my sister’s car and fill up with gas. Again, I didn’t understand what gas had to do with people crashing planes into buildings, but I tagged along with my sister anyways. Nobody wanted to be alone that day.

I remember being glued to the television that night. My whole family sat there together watching the coverage of the day’s tragic events. I had never been so interested in the news, as I was that day. President George W. Bush came on with a speech, telling everyone that he would not rest until the people responsible were brought to justice. He kept going on about Afghanistan and all I could think about is “where in the world did they come up with a name like that for a country?” And for a third time in one day, I was confused. I didn’t see the connection between that country and the USA.

That entire day I slowly tried to figure out what had really happened and what it meant, why it happened and who was so mad at us? I just didn’t understand.

What I did understand that day, however, was what it meant to be an American. I think that day we all understood. After watching thousands of men and women, fire fighters and cops, bystanders and family members risk their lives to help others and find people in all the rubble, I knew what our country was about.

I not only saw what our country could do when being attacked, I felt it. As I sat there on my couch, I cried for those people. I cried for the moms and the dads that didn’t get to say goodbye to their children. I cried for the spouses that said their last, “I love you”‘s that morning. And I cried for the people who felt it was okay to take innocent lives in order to make a statement.

I hear the song, “Proud to be an American” and I am instantly taken back to the moment. Instantly. I get goose bumps thinking back to the footage of our country coming together. I may not have been directly involved or impacted by the event’s, but I think we all learned a little bit more about our country on that gruesome day. And that was a cool thing to see, whether you understood everything or not.

Thank you to those men and women who risked everything on September 11, 2001 and thank you to those who are still defending our freedom today. You are truly heroes. God bless the USA.

fall fun friday: hurricane jar centerpiece.

Sooner or later, you’ll figure out that my favorite season is FALL…if you haven’t already. I’m the girl who asks in August if it’s ok to put out the fall decorations or light the fall-scented candles. I mean, who can resist the Yankee Candles “Autumn Wreath” or “Apple Cider”? Those are classic smells that I wish I could smell all year-long.

In preparation of the upcoming [best] season [ever], I thought I’d begin a 3-part series called “fall fun friday”. Fall doesn’t officially start until Sept. 22 so that gives me three Fridays to share my three fall projects I’ve completed.

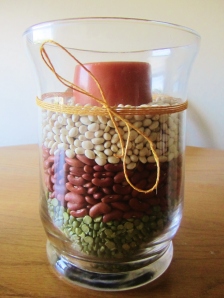
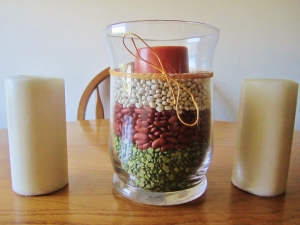
Today is my simple, inexpensive dinner table centerpiece. In our small apartment, it’s one of the first things you see when you walk in and I love it. It contains every fall color and the candle is even “pumpkin spice” scent. Who wouldn’t love it?

that’s as good as my bow tying gets.

Materials Needed:

  • 1 bag dried green split peas ($1.50)
  • 1 bag dried light red kidney beans ($1.20)
  • 1 bag dried navy beans ($1.20)
  • 1 bundle of yellow string ($1)
  • 1 tall and thick orange candle ($3)
  • 1 hurricane jar (FREE – from my awesome mom. Seen them cheap at DG)

Directions:

  • Place the tall orange candle in the middle of the jar
  • Pour the green split peas around the candle to desired height
  • Continue with both the kidney beans and navy beans
  • Tie string around the outside of jar and make into a bow

That’s it. It took me FIVE minutes to make this project and cost practically nothing. I spent a total of $8 and if you can find cheaper beans or already have some, then you’re set!

PS: the two white candles on the sides of the jar are from the table we ate at the night my husband proposed to me. AWWWW. 🙂

isn’t he such a romantic?

Happy fall y’all!

amy’s delicious, healthy chili.

Who doesn’t love a nice warm, delicious bowl of chili on a cold winter night? I enjoy that too, but I also could eat it any season of the year. In fact, I just made a pot of it over the weekend. My husband loves my chili! I make it a lot when we have company over in the fall and winter, because it’s so easy and makes a lot, so there is always enough for everyone. I have friends who make it now, because they loved it so much. My husband and I lead the youth group at our church and we even made it for a fundraiser one Sunday and the church members could not get enough of it. I know, I know, I’m bragging an awful lot about my own chili…obnoxious, right? Well, actually it’s not even my recipe. The recipe is actually my wonderful big sister’s. Since it is loved by so many, I thought I’d be nice and share it so that you can enjoy it too! 😉

Ingredients:

  • 1 T. olive oil
  • 1 lb. ground turkey
  • 1 green pepper, diced
  • 1 yellow onion, diced
  • 1 16 oz can kidney beans, drained
  • 2 16 oz cans tomato puree
  • 1 16 oz can stewed tomatoes (mexican style) [be sure NOT to drain!]
  • 1 16 oz can (drained) or frozen package of whole kernel corn
  • 1 packet (I use mild) chili mix

Directions:

  • Heat oil in skillet over medium-high heat. Add the ground turkey, onions and peppers. Cook until turkey is well browned (stir often to separate meat). Strain.
  • In a large pot set on medium-high heat, add the tomato puree, beans and corn (you don’t have to pre-cook these) and turkey mixture.
  • Pour liquid from the stewed tomatoes into the pot (you can put all, half, or none of this, depending on how soup-y you like your chili), but not the tomatoes yet. Chop the stewed tomatoes into fourths, then add them to the chili.
  • Once all of the ingredients are mixed well in the pot, pour the packet of chili mix onto the chili. As you pour it, use a spatula to rotate the chili from the bottom to the top, so as to get the powder mixed well throughout.
  • Reduce heat to low. Cover and cook for 30 minutes or until mixture is bubbling. Stir occasionally.
  • Serve with shredded cheese on top and crackers.

Serves:

  • This recipe serves about 7 good size bowls of chili. If you need more, just double the recipe. I’ve done that before and it works fine.

For all of these ingredients, I usually spend about $12 at the grocery. You can’t beat that for a meal that lasts several nights or feeds lots of company. Give it a shot and let me know how it turns out or if you change anything! 🙂